> ## Content Index
> Fetch the complete content index at: https://blog.hacking.pub/llms.txt
> Use this file to discover other available public pages before exploring further.
# express.js 源码三探 —— response篇
- URL: https://blog.hacking.pub/2017/03/12/express-js-yuan-ma-san-tan-responsepian/
- Published: 2017-03-12T08:54:36.000Z
- Updated: 2017-03-13T03:51:04.000Z
- Author: chainhelen
- Tags: js, javascript, nodejs, express, 源码剖析, 语言
#### 本篇
本篇是这个系列的第三篇,谢谢各位的建议
#### 环境
保持与之前的版本一致,源码版本是[express.js 4.14.1](https://github.com/expressjs/express/tree/4.14.1?ref=blog.hacking.pub)
---
## response源码
###### Object.create
打开[response.js](https://github.com/expressjs/express/blob/4.14.1/lib/response.js?ref=blog.hacking.pub#L41),从上往下看代码,[代码具体戳这里](https://github.com/expressjs/express/blob/4.14.1/lib/request.js?ref=blog.hacking.pub#L41)
```
var res = module.exports = {
__proto__: http.ServerResponse.prototype
};
```
上一篇我们讲到request对象和http.IncomingMessage的关系,那么类似的response和ServerResponse也是一样的
但是注意最新的express代码中已经不用这个,采用Object.create(),[看最新的代码](https://github.com/expressjs/express/blob/5.0.0-alpha.5/lib/response.js?ref=blog.hacking.pub#L41)
```
var res = Object.create(http.ServerResponse.prototype)
```
Object.create是E5中提出的一种新的对象创建方式,本质上也是把res.\_\_proto\_\_指向ServerResponse.prototype
##### res.status
```
res.status = function status(code) {
this.statusCode = code;
return this;
};
```
这个比较简单,就是设置http 返回头的状态码
##### res.links
这个是设置http 头中links字段
```
res.links = function(links){
var link = this.get('Link') || '';
if (link) link += ', ';
return this.set('Link', link + Object.keys(links).map(function(rel){
return '<' + links[rel] + '>; rel="' + rel + '"';
}).join(', '));
};
```
至于为什么会有link这样的http头字段,我之前没听过,搜索看到了[ RFC 5988](http://www.ietf.org/rfc/rfc5988.txt?ref=blog.hacking.pub),link字段是要表达资源的关系
##### res.send
```
switch (typeof chunk) {
// string defaulting to html
case 'string':
if (!this.get('Content-Type')) {
this.type('html');
}
break;
case 'boolean':
case 'number':
case 'object':
if (chunk === null) {
chunk = '';
} else if (Buffer.isBuffer(chunk)) {
if (!this.get('Content-Type')) {
this.type('bin');
}
} else {
return this.json(chunk);
}
break;
}
```
res.send通常来讲的参数有三种Buffer、json格式、string
- string类型,如果没有定义Content-Type,就设置返回类型为html
- Buffer,就把类型定义为bin(二进制)
- json格式,会去调用app.json函数
紧接着下面的代码重新计算etag的值
```
// populate ETag
var etag;
var generateETag = len !== undefined && app.get('etag fn');
if (typeof generateETag === 'function' && !this.get('ETag')) {
if ((etag = generateETag(chunk, encoding))) {
this.set('ETag', etag);
}
}
```
然后就是查看缓存
```
// freshness
if (req.fresh) this.statusCode = 304;
```
[获取req.fresh值,get的属性](https://github.com/expressjs/express/blob/4.14.1/lib/request.js?ref=blog.hacking.pub#L448)
```
defineGetter(req, 'fresh', function(){
var method = this.method;
var s = this.res.statusCode;
// GET or HEAD for weak freshness validation only
if ('GET' !== method && 'HEAD' !== method) return false;
// 2xx or 304 as per rfc2616 14.26
if ((s >= 200 && s < 300) || 304 === s) {
return fresh(this.headers, (this.res._headers || {}));
}
return false;
});
```
可以看看库fresh的代码,主要是判断两点
- 请求头中\["if-none-match"\]能不能匹配\*,或者res对象中\["etag"\]
- res对象中\['last-modified'\]是否小于等于请求头\["if-modified-since"\]
能匹配上,fresh都会为true,也就是head.status = 304
##### res.json
主要是返回json格式的内容,当把json数据序列化成string格式后,函数的结尾还是调用的res.send发送字符串
```
// settings
var app = this.app;
var replacer = app.get('json replacer');
var spaces = app.get('json spaces');
var body = stringify(val, replacer, spaces);
```
如上面所示,val是key-value的js对象,stringify本质上调用了JSON.stringify的函数
**1** 参数replacer是函数,是对val里面的对应key变换val的
比方说
```
var val = { name: 'tobi', _id: 12345 };
var str = JSON.stringify(val, (key, value) => {
return '_' == key[0]
? undefined
: val;
});
console.log(str);
//输出为字符串: {name:'tobi'}
```
**2** 参数spaces是对输出字符串的添加一些缩进、空格、换行、
```
var str = JSON.stringify({name : "w"}, undefined, 2);
console.log(str);
//输出
{
name : "w"
}
```
##### res.jsonp
发送jsonp格式的数据,什么是jsonp
就是解决跨域问题,ajax请求是不能跨域的,但是js标签的请求是可以跨域的<\\scrpit>
是不是同一个域主要看三个:域名,端口,协议
```
var app = express();
app.use(function(req, res){
res.jsonp({ count: 1 });
});
request(app)
.get('/?callback=something')
.expect('Content-Type', 'text/javascript; charset=utf-8')
.expect(200, /something\(\{"count":1\}\);/, done);
```
通过url中的callback的参数去请求跨域的资源
##### res.sendStatus
设置返回状态码并 把状态码作为文本返回
```
res.sendStatus = function sendStatus(statusCode) {
var body = statusCodes[statusCode] || String(statusCode);
this.statusCode = statusCode;
this.type('txt');
return this.send(body);
};
```
##### res.sendFile/sendfile
注意看一下,除了res.sendFile之外,还有一个res.sendfile的函数定义,可见已经不建议使用res.sendfile
```js
res.sendFile = function sendFile(path, options, callback) {
...
// create file stream
var pathname = encodeURI(path);
var file = send(req, pathname, opts);
// transfer
sendfile(res, file, opts, function (err) {
if (done) return done(err);
if (err && err.code === 'EISDIR') return next();
// next() all but write errors
if (err && err.code !== 'ECONNABORTED' && err.syscall !== 'write') {
next(err);
}
});
};
res.sendfile = function (path, options, callback) {
...
}
res.sendfile = deprecate.function(res.sendfile,
'res.sendfile: Use res.sendFile instead');
```
上面的res.sendFile里面有调用了一个[**senfile函数**](https://github.com/expressjs/express/blob/4.14.1/lib/response.js?ref=blog.hacking.pub#L964),具体实现如下
```js
function sendfile(res, file, options, callback) {
var done = false;
var streaming;
...
file.on('directory', ondirectory);
file.on('end', onend);
file.on('error', onerror);
file.on('file', onfile);
file.on('stream', onstream);
onFinished(res, onfinish);
...
// pipe
file.pipe(res);
}
```
这个函数里面有大量的事件驱动,这个事件驱动的信号是在哪里触发的呢?
如下,翻源码,是在依赖的库[./node\_modules/send/index.js](https://github.com/pillarjs/send/blob/0.14.2/index.js?ref=blog.hacking.pub#L664)中
函数的开头fs.stat尝试去读取变量path这个文件,如果能读到文件,那么[Line676](https://github.com/pillarjs/send/blob/0.14.2/index.js?ref=blog.hacking.pub#L676) 就发出"file"的信号,接着调用self.send
如果读取不到文件,也有定义了的next函数,在next中[Line687](https://github.com/pillarjs/send/blob/0.14.2/index.js?ref=blog.hacking.pub#L687) 会尝试对文件进行拼接各种不同的后缀名再去尝试读取
(这里有个逻辑[Line 692](https://github.com/pillarjs/send/blob/0.14.2/index.js?ref=blog.hacking.pub#L692),可以明白如果找到相应name.extension的目录而非文件name.extension,是直接跳过的)
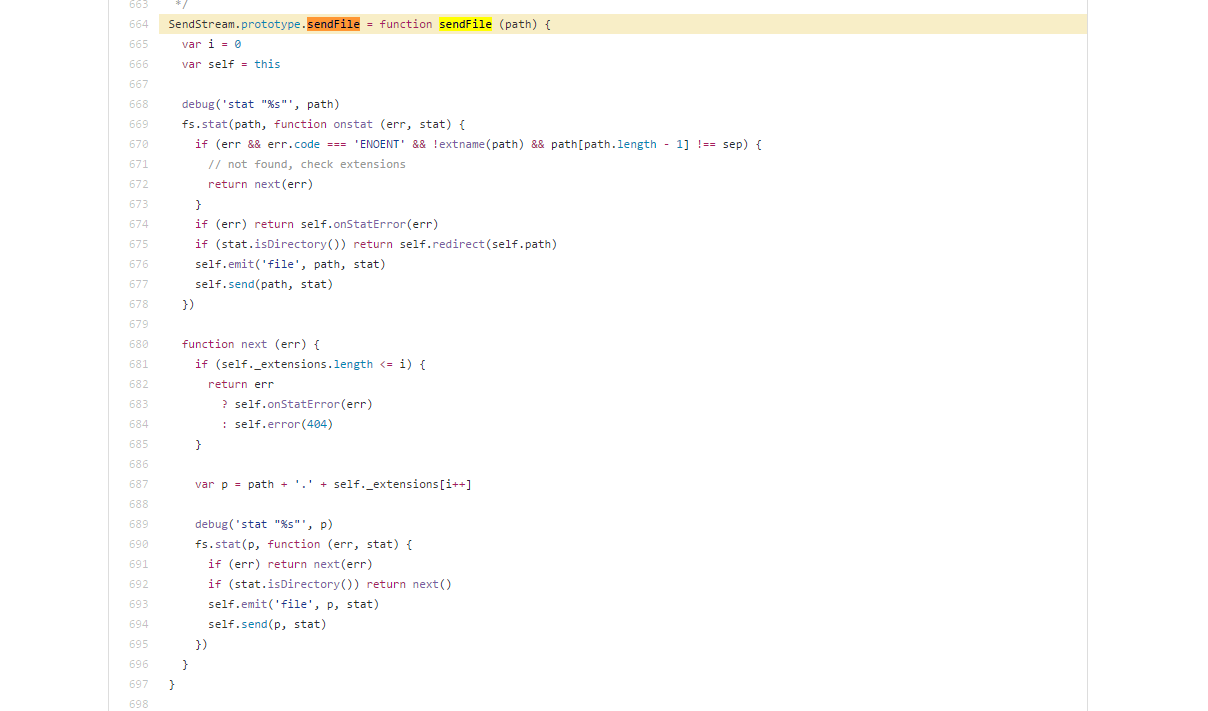
然后代码Line 677,Line 694可以调用了[**self.send**](https://github.com/pillarjs/send/blob/0.14.2/index.js?ref=blog.hacking.pub#L561),看看它的实现
```
SendStream.prototype.send = function send (path, stat) {
...
// 如果有缓存的话,就不需要服务器重新发送
if (this.isConditionalGET() && this.isCachable() && this.isFresh()) {
this.notModified()
return
}
...
this.stream(path, opts)
}
```
当数据配置处理完,存在opts对象里面,比如start、end等属性,然后通过this.stream(path, opts)来调用,继续看[**this.stream的实现**](https://github.com/pillarjs/send/blob/0.14.2/index.js?ref=blog.hacking.pub#L737)
```
SendStream.prototype.stream = function stream (path, options) {
// TODO: this is all lame, refactor meeee
var finished = false
var self = this
var res = this.res
// 创建读入流对象
var stream = fs.createReadStream(path, options)
// 发送'stream'的信号,跟上面response.js里面file.on('stream', onstream);
this.emit('stream', stream)
//利用管道把数据流入res
stream.pipe(res)
// response finished, done with the fd
onFinished(res, function onfinished () {
finished = true
destroy(stream)
})
// error handling code-smell
stream.on('error', function onerror (err) {
// request already finished
if (finished) return
// clean up stream
finished = true
destroy(stream)
// error
self.onStatError(err)
})
// 数据流完结,发送'end'
stream.on('end', function onend () {
self.emit('end')
})
}
```
可见几个最核心的事件驱动信号都在这,error、end、stream等
stream.pipe(res)通过管道的数据流给res
##### res.download
这个函数最核心的地方也就是调用上面的res.sendFile
##### res.contentType/res.type
设置返回头的content\_type字段
##### res.format
根据客户端可接受的mime-type格式,执行不同的函数
参数obj,格式举例如下
```
{
text: function(){
body = statusCodes[status] + '. Redirecting to ' + address;
},
html: function(){
var u = escapeHtml(address);
body = '' + statusCodes[status] + '. Redirecting to ' + u + '
';
},
default: function(){
body = '';
}
}
```
**1**.当客户端接受text格式的报文,那么就调用text属性的函数,构造body
**2**.如果客户端不接受上面任意报文格式,那么尝试执行Obj对象的default属性函数
**3**.如果上面两种情况都没有触发,那么返回状态码406
##### res.attachment
```
res.attachment = function attachment(filename) {
if (filename) {
this.type(extname(filename));
}
this.set('Content-Disposition', contentDisposition(filename));
return this;
};
```
这个跟Content-Disposition header字段有关
attachment 触发浏览器弹出下载框
inline 触发浏览器内嵌显示
具体的http头格式如下
```
Content-disposition: inline; filename=filename.txt
Content-disposition: attachment; filename=filename.txt
```
##### res.append
这个函数比较简单,就是给返回http中添加头字段
如果先前设置过该field,那么把这个value就跟先前value拼接成数组作为新的value,举例如下
```
res.append('Link', ['', '']);
res.append('Set-Cookie', 'foo=bar; Path=/; HttpOnly');
res.append('Warning', '199 Miscellaneous warning');
```
函数核心是调用res.set方法
##### res.set/header/get/clearCookie/location/redirect
set/header(field,value) 设置http某个具体字段
get(field) 获取http某个具体的字段
clearCookie(name) 删除cookie中的某个字段(这里是cookie的字段,不是Http头字段)
location 设置http头中location字段
redirect 302重定向到新的url
##### res.cookie(name, value, options)
这个是往原有的Set-Cookie(更新客户端的cookie)里面添加(注意不是覆盖)新的field-value
参数name、value分别代表field-value
options是具有三个属性的对象(不强制一定要三个),具体属性格式如下
```
`maxage` 设置最大过期时间,也可以使用expires
`signed` true or false,代表这个cookie是否是signed的cookie
`path` 默认路径是"/"
函数使用方式如下
httponly是告诉浏览器这个cookie不可以让js这类脚本获取到的,可有效缓解xss攻击
res.cookie('rememberme', '1', { expires: new Date(Date.now() + 900000), httpOnly: true });
res.cookie('rememberme', '1', { maxAge: 900000, httpOnly: true })
```
这里面最让人迷惑的是signed cookie
```
res.cookie = function (name, value, options) {
...
var secret = this.req.secret;
var signed = opts.signed;
...
if (signed) {
val = 's:' + sign(val, secret);
}
...
this.append('Set-Cookie', cookie.serialize(name, String(val), opts));
...
};
```
可见代码中signed cookie的value是以s:开头的,具体作用是什么?
看看测试样例里面的[代码](https://github.com/expressjs/express/blob/4.14.1/test/req.signedCookies.js?ref=blog.hacking.pub)
```js
var cookieParser = require('cookie-parser')
...
app.use(cookieParser('secret'));
app.use(function(req, res){
if ('/set' == req.path) {
//第一次请求返回的signed cookie信息
res.cookie('obj', { foo: 'bar' }, { signed: true });
res.end();
} else {
res.send(req.signedCookies); //第二次返回从req cookie中解析出来的数据
}
});
request(app)
.get('/set') //第一次请求
.end(function(err, res){
if (err) return done(err);
var cookie = res.header['set-cookie'];
request(app)
.get('/')
.set('Cookie', cookie)
.end(function(err, res){
if (err) return done(err);
res.body.should.eql({ obj: { foo: 'bar' } }); //第二次请求返回的内容
done();
});
});
```
从这里我们可以了解到,结合cookeParse库,我们可以把数据加密放在signed cookie里面,而且这个密钥是由开发者放进去的
当客户端携带signed cookie再次请求的时候,cookeparse中间件解析signed cookie,开发者可以通过属性req.signedCookies把之前数据拿出
##### res.vary
对返回http报文中的字段vary设置
vary这个字段主要是告诉缓存服务器,如果同一个 URL 有着不同http返回资源时,需要缓存和筛选合适的版本
例如在函数res.format调用了this.vary("Accept")
这是因为函数format就是要对不同格式的Accpet返回不同的Content-Type格式
```
Accept 告知服务器发送何种媒体类型 Content-Type
Accept-Language 告知服务器发送何种语言 Content-Language
Accept-Charset 告知服务器发送何种字符集 Content-Type
Accept-Encoding 告知服务器采用何种压缩方式 Content-Encoding
```
当然如果我们的资源对于不同的浏览器返回是不一样的,也就是浏览器的UA
那么我们服务器返回http中应该含有这样的字段
```
Vary: User-Agent, Cookie
```
##### res.render
这个函数主要调用了app.render,后面分析application.js的时候再介绍
---
**未经同意,禁止转载**
**by chainhelen**